I recently gave a Lunch-and-Learn at work on a .NET resilience and transient-fault-handling library called Polly (to be covered in a future post). As I was preparing, I found myself needing to create a two-way communication demo showing an app talking to an API. I wanted to be able to show the following events in real time:
- The app sends an HTTP GET request to the API
- The API receives the HTTP GET request
- The API sends an HTTP response back to the app
- The app receives the HTTP response
Pretty standard stuff, right? I considered creating two separate solutions, opening each in its own instance, and debugging them at the same time, but I preferred keeping everything in a single solution to keep things simple. It was at this point that I realized I’d never done that before, namely running two separate apps from the same solution simultaneously. Perhaps that’s old hat to you, but I was at a loss for how to accomplish it. Turns out, it’s fairly simple. Here’s how you can do it.
[edit] For context, this was written back when I did all my C# development with Visual Studio. I now use vscode and the dotnet CLI almost exclusively, which means much of this post feels outdated.
Step 1 – Create the Solution
I make it a practice to always start with a blank solution and then add whatever project(s) I need.
- In Visual Studio, open the New Project dialog (File > New > Project) and search for the “Blank Solution” template. I named mine
Demo. - Right-click on the solution name in the Solution Explorer, choose Add > New Project, and select the Console App (.NET Core) project type. I named mine
Demo.Api. - Do the same thing again, naming the project something different. I named mine
Demo.App.
Step 2 – Install NuGet Packages
Now we need to install the latest versions of the following NuGet packages. If you don’t already know how to do this, here is a helpful link.
- Microsoft.AspNet.WebApi.Client (both projects)
- Microsoft.AspNetCore.Hosting (only the API project)
Step 3 – Setup the API
In order to get the API project to actually work like an API we’ll need to add some stuff. Let’s add a new class file in the API project called Startup.cs:
using Microsoft.AspNetCore.Builder;
using Microsoft.AspNetCore.Hosting;
using Microsoft.Extensions.Configuration;
using Microsoft.Extensions.DependencyInjection;
using Microsoft.Extensions.Logging;
using System.Reflection;

namespace Demo.Api
{
    public class Startup
    {
        public Startup(IConfiguration configuration)
        {
            Configuration = configuration;
        }

        public IConfiguration Configuration { get; }

        public void ConfigureServices(IServiceCollection services)
        {
            services.AddMvc()
                .AddApplicationPart(Assembly.Load(new AssemblyName("Demo.Api")));
            services.AddLogging(
                builder =>
                {
                    builder.AddFilter("Microsoft", LogLevel.Warning)
                           .AddFilter("System", LogLevel.Warning)
                           .AddConsole();
                });
        }

        public void Configure(IApplicationBuilder app, IHostingEnvironment env)
        {
            if (env.IsDevelopment())
            {
                app.UseDeveloperExceptionPage();
            }

            app.UseMvc();
        }
    }
}
And now we can update Program.cs to use the new Startup class.
using Microsoft.AspNetCore;
using Microsoft.AspNetCore.Hosting;

namespace Demo.Api
{
    public class Program
    {
        public static void Main(string[] args)
        {
            BuildWebHost(args).Run();
        }

        public static IWebHost BuildWebHost(string[] args) =>
            WebHost.CreateDefaultBuilder(args)
                .UseStartup<Startup>()
                .UseKestrel()
                .Build();
    }
}
And finally, if we want the API to have any endpoints we’ll need to add a controller. I’ve called this one DemoController.cs. There’s only one endpoint here, but this is where you’d add any others you may need.
using Microsoft.AspNetCore.Mvc;
using System;
using System.Threading.Tasks;

namespace Demo.Api
{
    [Route("api/[controller]")]
    public class DemoController : Controller
    {
        [HttpGet]
        public async Task<IActionResult> Get()
        {
            Console.WriteLine("Received request: GET /demo");
            await Task.Delay(100); // simulate processing some data
            Console.WriteLine("Sending response: 200 OK");
            return Ok();
        }
    }
}
Step 4 – Setup the App
Let’s create a new class file in out App project called App.cs where all of our demo logic will reside.
using System;
using System.Collections.Generic;
using System.Net.Http;
using System.Net.Http.Headers;

namespace Demo.App
{
    public class App
    {
        private HttpClient _httpClient;
        private const string _baseUrl = "http://localhost:5000/api/";

        public App()
        {
            _httpClient = new HttpClient();
            _httpClient.BaseAddress = new Uri(_baseUrl);
            _httpClient.DefaultRequestHeaders.Accept.Clear();
            _httpClient.DefaultRequestHeaders.Accept.Add(new MediaTypeWithQualityHeaderValue("application/json"));
        }

        public void Run()
        {
            while (true)
            {
                Console.Write("Press Enter to run demo... ");
                while (Console.ReadKey(true).Key != ConsoleKey.Enter) { }
                Console.WriteLine();
                Console.WriteLine($"Sending request: GET {_baseUrl}demo");
                var response = _httpClient.GetAsync("demo").Result;
                Console.WriteLine($"Received response: {(int)response.StatusCode} {response.StatusCode}");
            }
        }
    }
}
And now we can update Program.cs to use the new App class.
namespace Demo.App
{
    public class Program
    {
        public static void Main(string[] args)
        {
            new App().Run();
        }
    }
}
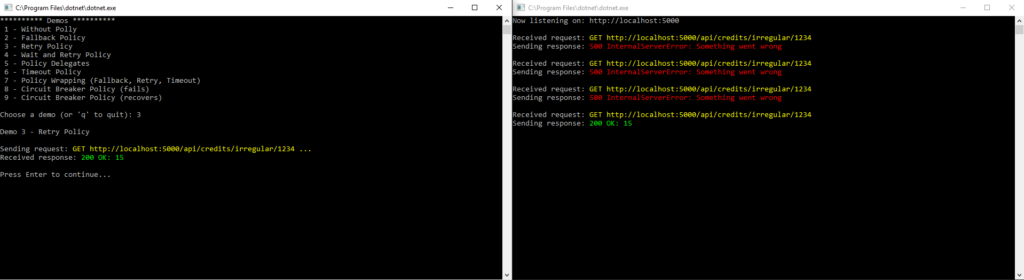
Step 5 – Run the Demo
So now let’s run the demo and see what we’ve made.
- Make sure that the API is set as the startup project
- Press F5 to start debugging the API project, which should launch a console window.
- Right-click on the
Demo.Appproject in the Solution Explorer and choose Debug > Start new instance. This should launch a second console window. - Snap each console window to separate sides of the monitor to make it easier to see both sides of the two-way communication.
- Click on the App’s console window to give it focus, and then press the Enter key.
- You should see that the app sent a request and the API received it. Then the API sent a response and the app received it.
And we’re done! That’s how to create a two-way communication demo.
related source code can be found here.